
Booking a Standing Order (Video Lesson)
This article will assume you understand the basics of RouteGenie as well as how to book a regular order.
Pre-Requisite Reading
The guide linked below will go in depth on adding orders to the RouteGenie system, that will not be specifically covered in this guide.
Recording A Trip From A Phone Call (Video Lesson)
What Is A Standing Order?
At Lakeshore, a lot of our clients will have re-occurring trips that will need to repeat on a schedule. Instead of entering orders for every single instance we can instead create what is called a standing order. A standing order is made from a single created order and then copied on to every future day that it will occur.
For example, lets say every Tuesday Bob Anderson has an appointment with his chiropractor from 11-12. Instead of making this order every single week we can simply create the order once and then instead of just saving it we select to create a standing order. This will allow us to repeat this order on any day of the week that we like, for as long as we like and we can also even set a reminder when the end date is near to see if we should continue on with it.
Its great because it turns an extremely long boring job into a quick and painless task.
How Do I Create A Standing Order
Keep in mind when planning a standing order that they must all take place at the same time of day. For example if you wanted a standing order for Joe every M-W-F for this to work the PU, DO, and Appointment times must all be the same every day. You can always modify them later but you can not set different times for each day when creating it. Your simply copying the days order on to another day.
Creating a standing order is quite simple, you start out by entering in the original order that you will start with, and then simply choose "CREATE STANDING ORDER" instead of clicking on "SAVE" like you normally would.

After selecting this option the trip will save in to the system and a new window will open up.
Standing Order Interface
While the standing order interface has some similarities to the regular order interface there are a lot of other intricacies presented to you and they are not exactly straightforward in how they work either.
Lets take a look at this video that explains how the standing order interface works.
Next we will go over some of the key factors and important points that we touched on in the video.
Standing Order Range
The main piece of information used to set a standing order is going to be the date range.
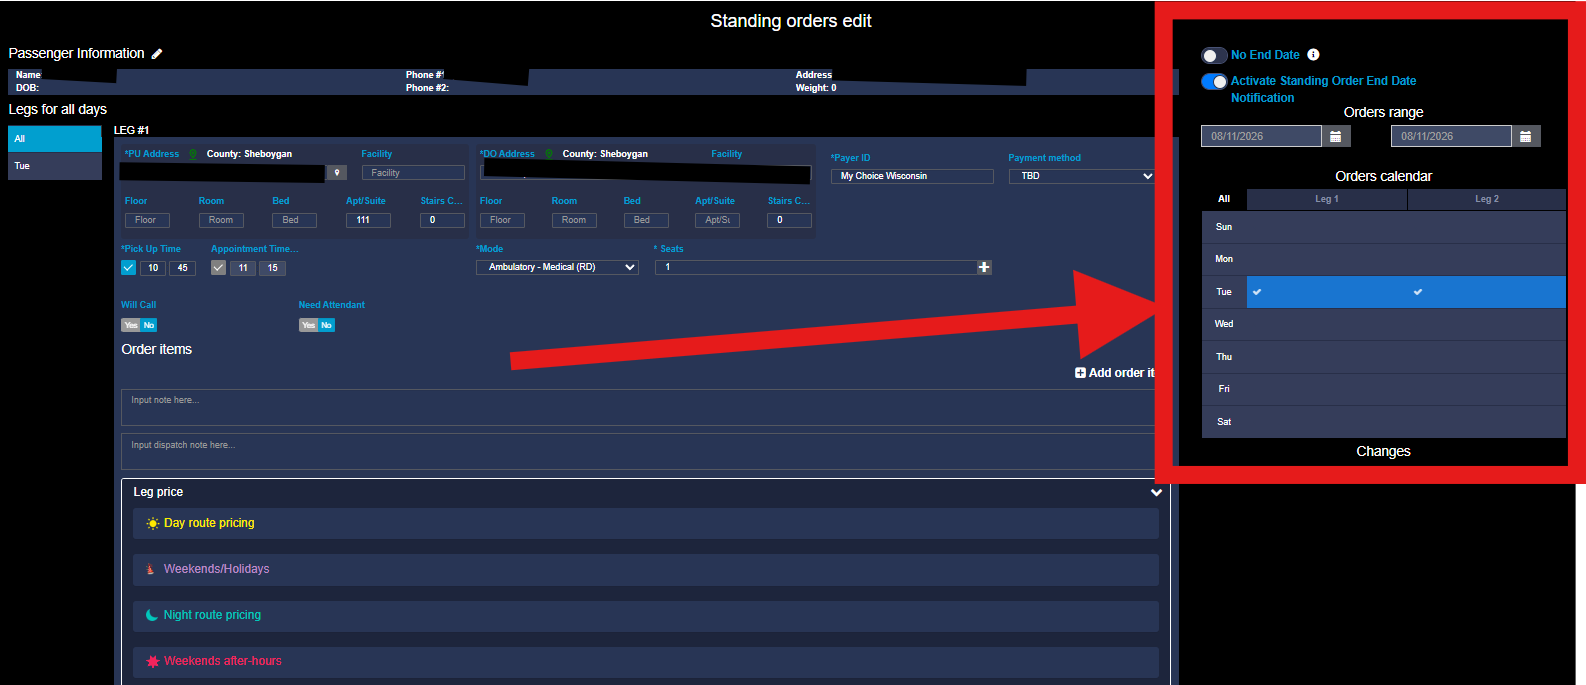
Shown above, this is essentially the life blood of the standing order. It lets the system (and us) know how long this will be in effect for. There are a couple options available to us when setting a range and it is important to understand how they work.
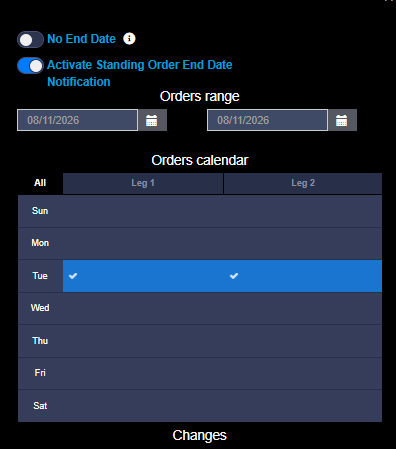
No End Date
Toggling on this option (shown in the image above) will remove "Activate Standing Order End Date Notification" and the end range from "Orders range" essentially putting the order in to an endless repeating state. We dont really use this at Lakeshore for a few reason but the biggest one is, orders always end eventually and when they do we need to cancel any remaining orders. We want to minimize cancelled orders from building up in the system as much as possible, also it limits your options when it comes to managing standing orders. So unless specifically told, this should always be left off.
Activate Standing Order End Date Notification
It is important to know when to leave this toggle on and when to shut it off.
I personally will often use standing orders to quickly create small groups of similar or very similar orders. In this instance I am manipulating the system to quickly enter trips. If accidentally left on the notification toggle every time I did this we would get flooded with standing order renewals that we did not need.
It also makes sense to leave it off if you KNOW the end date of the standing order, for example the client will be repeating the trip for two weeks only. In that case you know that you will not renew it.
For any other kind of order you want to leave it on so that you get a notification when it is time to extend the order again. I normally do most standing orders 2 or 3 months at a time but you can come up with your own system.
Order Range
Here you will actually set your range. Each entry has a calendar drop down, although you rarely need to change the start date, just the end. As I have said a few times now I find it best to set them for a couple months at a time but that is up to you.
One thing I will suggest is not to start setting all the end dates to the same date in an attempt to "organize" them and have them all be done on the same day. It seems like a good idea at first but you end up spending way too much time working with these on the day they change and it floods your notification drop down. I personally tried it when I first started and it is def. better to just do them one at a time as they come up.
Orders Calendar
So here you select the days and legs. The day and legs of your initial order will already be selected automatically. The image above only shows 2 legs, when there is more than 2 a column is just added for each extra leg.
If you want to repeat the orders and legs on other days as well you simply click the box to add a check mark in each corresponding spot.
Changing and Ending Standing Orders
Ending An Order
When it is time to end an order you simply uncheck every box in the "Orders Calendar" and set the end date in the range to the current day. Then scroll all the way down to the bottom and hit save.
Pre-Assigned Orders
Keep in mind that when you make changes or end a standing order only the unassigned orders will be changed or ended. Pre Assigned orders will need to be manually changed or cancelled.
When simply making an address or time change it is best to unassign all of the pre-assigned orders first and then go and edit the standing order.
When it comes to canceling them this does not apply as it is just as much work to unassign them as it is to cancel them.
No comments to display
No comments to display