This Guide will assume basic knowledge of RouteGenie and that you have set up your work accounts for both Gmail and RouteGenie
One of the most common ways we record trips at lakeshore is over the phone. When a client calls in with a ride request we generally do not enter it directly in to RouteGenie for multiple reasons, The main one being that it is simply more complicated and prone to error. When we first started out we all had our own way of taking trips down with our personal preference of notepad be it digital or physical. The problem with this is we end up losing trips to human error. This may not seem like a big deal but if everyone forgets to enter in one or two trips a week it starts to add up pretty quick. ## **The Solution** We created a form to be filled out that records the trips in to a log. This form provides us with a simple way to take down trip information and it also keeps track of them in a log making it easy to ensure they were entered as well as making it easy to review them later. No more forgotten entries and mistakes can easily be reviewed. [The Form](https://tally.so/r/obdzRV) [The Log](https://docs.google.com/spreadsheets/d/1ANK_5RJ3hELz5dB6MAGlO0mv37qTGvUF6u6ksdBvLg0/edit?gid=176411082#gid=176411082) The links above will bring you to the form we fill out when we are on the phone with clients as well as the log that we use to keep track of trips. ## **The Process** In the video below we take a look at filling out the form: When someone calls in we simply fill out the form asking the client the questions in the order that they appear. We generally try to fill out as many of these boxes as we can especially if the customer is new, for new clients it is extremely important to get all that information the form asks for and then some. ### **Payer Information For New Clients** When you take down the payer information for a new client it is not enough to get just the payer name. In the same box include the case workers name, phone number, and email. If there is no caseworker make sure to get a point of contact and their phone number incase any billing issues arise. ### **Getting Quotes** Clients both new and old will often want quotes and providing one is simple as there is a calculator that I made. ##### **Github Repo for Calculator and Link to Calculator:** [Github Repository](https://github.com/Catrat6/calc) [Pricing Calculator](https://www.blackmagik.xyz/lake_calc.html) We use this calculator to provide quotes to the client. Well, we call it a quote but generally if you did it right it should be exactly what the client will be paying, in fact, we should do our best to avoid giving clients an estimate as it causes nothing but issues. #### **Using the Pricing Calculator** In this video below I will explain how the pricing calculator works: After getting a quote for the client with the calculator and giving it to them make sure that you then head over to slack and post it in the billing channel. Make sure to tag either channel or one of the admins that work on billing and include in the message what client and trip the quote is for. Alternatively we also share ***NEW*** client info in the exact same way often combining the two. ## **Entering the Trip Into RouteGenie** Finally after we have gathered all the trip information there is to gather we are going to enter the trip into RouteGenie. ### **Developing your workflow** Everyone will do it differently, some people will enter the trip into RG right away while others will let them pile up in the log before they get to them. Lets take a look at the trip log below: [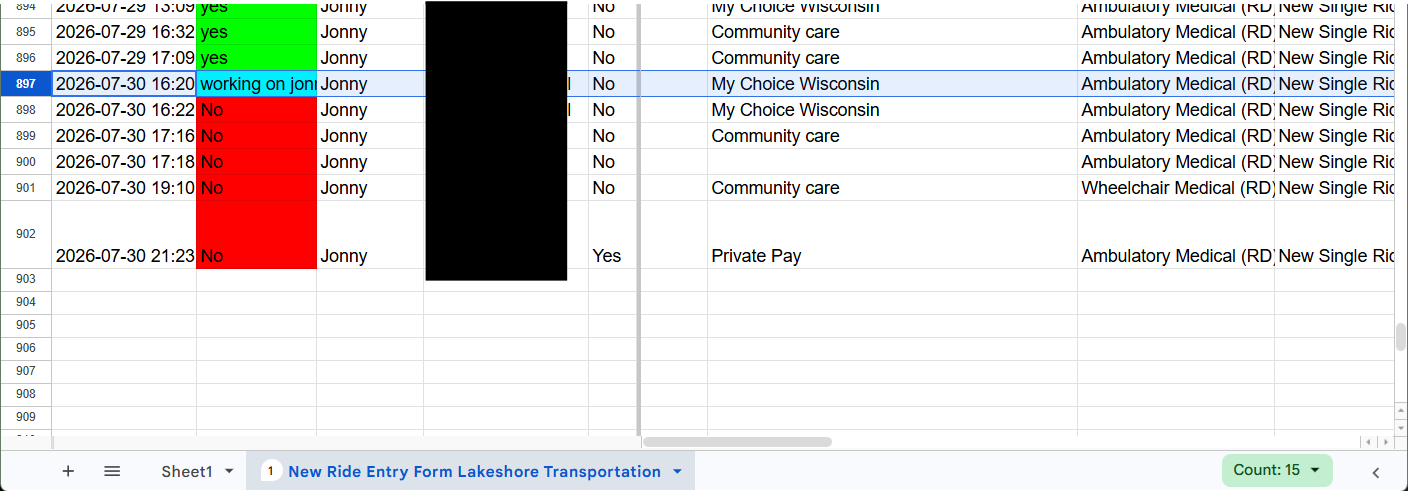](https://lakeshorekb.xyz/uploads/images/gallery/2026-07/VcPimage.png) After you submit your trip from the form this is where they end up, The black box is just protecting client names. The important thing I wanted to point out is the second column. This column will change color depending on what text has been entered in the cell, while a default entry will be made based on the first question in the form you can also simply enter text by double clicking on the form and typing it, it is not case sensitive and the "working on" text can include anything else but will highlight blue so long as those letters are included. If your are working on a row you simply type "working on *insert name".* **Yes -** The trip has been entered in to RouteGenie **No -** The trip has not yet been entered in to RouteGenie **Working On -** This phrase is normally followed by an employee name and it means what it says, **X** employee is currently working on entering the trip. It is ok to not enter your trips right away either, sometimes we help each other out and sometimes someone just turns through 10 of them at once. Like I said, you will develop your own workflow. #### **From Form to Genie** When it has finally come time to enter them in to the system there are a few ways we can go about it. In the video below we will take a look at all the different options to get to the trip entry interface inside of RouteGenie, there are more than a few: As shown in the above video we have quote a few options to enter trips. As talked about in other articles it is important to remember that it does not matter how a trip is entered in to the system, it is all one in the same. Entering the trip in to RouteGenie creates an object that can be used all throughout RouteGenie. #### **Add Order Interface** Regardless of what section you click "Add Order" in, aside from using "Trip Import", you will find that the interface is one in the same. [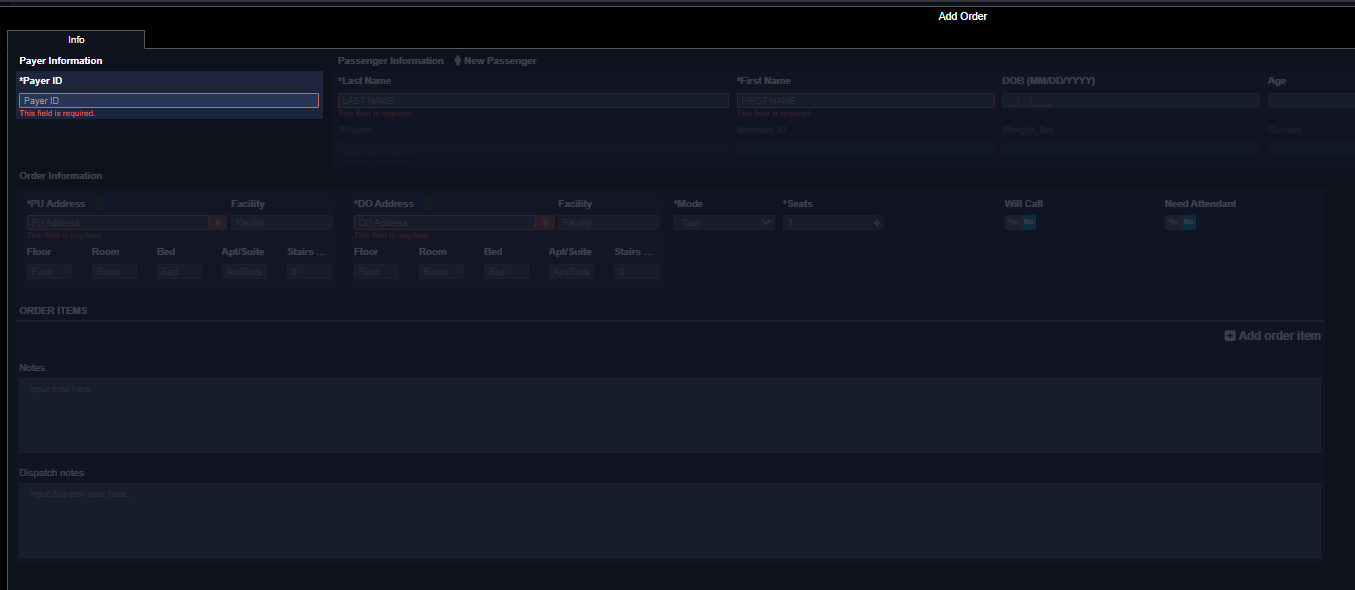](https://lakeshorekb.xyz/uploads/images/gallery/2026-07/NLaimage.png) As you fill out cells in this interface a dropdown menu will auto populate with options based on what you have typed. Remember that even if you can type the full entry yourself from memory you must always select the option from the drop down instead of simply typing it yourself. You can only type it yourself if it is 100% new to the system otherwise you will encounter an error. It is a strange feature but you will find that it happens regularly across RouteGenie. In fact its one of the few constants you can rely on in this system. The positive thing about it is that it keeps typos from happening is they for the most pat just simply cant. This in combination with our form really brings us up to a pretty solid number on correct entries with only a few incorrect ones escaping every once in a while. #### **B Leg Entry** After the first part of the trip has been entered and we need to enter the B-leg just click on the box outline in red (shown below). [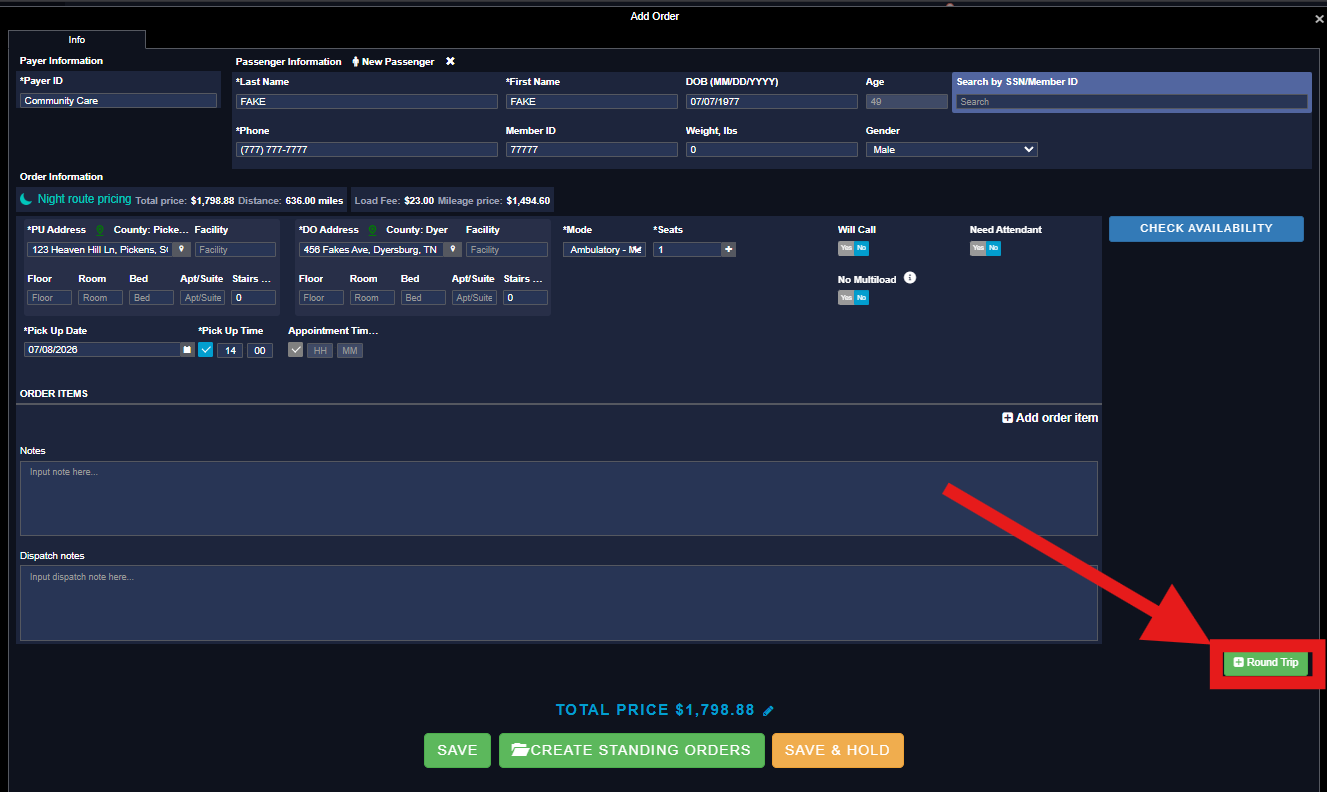](https://lakeshorekb.xyz/uploads/images/gallery/2026-07/4smimage.png) Then the trip window will expand the address fields will auto populate in reverse and you can enter the return ride. If you need to add any more legs and you would prefer to group them all together you can repeat the task, although this time (and every time after) the green box will say "Add Extra Leg" (shown below). ### **Submitting Trip** After all is said and done and the trips have been entered in we can finally focus on the cluster of buttons on the bottom. ##### **Save** [](https://lakeshorekb.xyz/uploads/images/gallery/2026-07/Nm9image.png) This will simply save your trip in the system, after doing this your trip has no become an object that can be accessed throughout RouteGenie. ##### **Create Standing Order** [](https://lakeshorekb.xyz/uploads/images/gallery/2026-07/LV6image.png) Creating a standing order is far beyond the scop of this conversation so we will not deep dive on it here but it allows you to repeat an order for as many days as you would like for as long as you would like. This provides a quick way to do that as soon as you have entered the initial trip in. Clicking this will also first save your trip in the system, before opening the standing order interface. Alternatively this can be used as a hack to quickly copy identical trips. ##### **Save & Hold** [](https://lakeshorekb.xyz/uploads/images/gallery/2026-07/Y0rimage.png) Saves the Order/Trip but places it on Hold, this can be used when a client wants to schedule a trip but is not 100% sure what they will need. # Booking a Standing Order (Video Lesson)This article will assume you understand the basics of RouteGenie as well as how to book a regular order.
#### Pre-Requisite Reading The guide linked below will go in depth on adding orders to the RouteGenie system, that will not be specifically covered in this guide. [Recording A Trip From A Phone Call (Video Lesson)](https://lakeshorekb.xyz/books/recording-trips-in-route-genie-video-lessons/page/recording-a-trip-from-a-phone-call-video-lesson "Recording A Trip From A Phone Call (Video Lesson)") ## What Is A Standing Order? At Lakeshore, a lot of our clients will have re-occurring trips that will need to repeat on a schedule. Instead of entering orders for every single instance we can instead create what is called a standing order. A standing order is made from a single created order and then copied on to every future day that it will occur. For example, lets say every Tuesday Bob Anderson has an appointment with his chiropractor from 11-12. Instead of making this order every single week we can simply create the order once and then instead of just saving it we select to create a standing order. This will allow us to repeat this order on any day of the week that we like, for as long as we like and we can also even set a reminder when the end date is near to see if we should continue on with it. Its great because it turns an extremely long boring job into a quick and painless task. ## How Do I Create A Standing OrderKeep in mind when planning a standing order that they must all take place at the same time of day. For example if you wanted a standing order for Joe every M-W-F for this to work the PU, DO, and Appointment times must all be the same every day. You can always modify them later but you can not set different times for each day when creating it. Your simply copying the days order on to another day.
Creating a standing order is quite simple, you start out by entering in the original order that you will start with, and then simply choose "CREATE STANDING ORDER" instead of clicking on "SAVE" like you normally would. [](https://lakeshorekb.xyz/uploads/images/gallery/2026-08/image.png) After selecting this option the trip will save in to the system and a new window will open up. ## Standing Order Interface While the standing order interface has some similarities to the regular order interface there are a lot of other intricacies presented to you and they are not exactly straightforward in how they work either. Lets take a look at this video that explains how the standing order interface works. Next we will go over some of the key factors and important points that we touched on in the video. ### Standing Order Range The main piece of information used to set a standing order is going to be the date range. [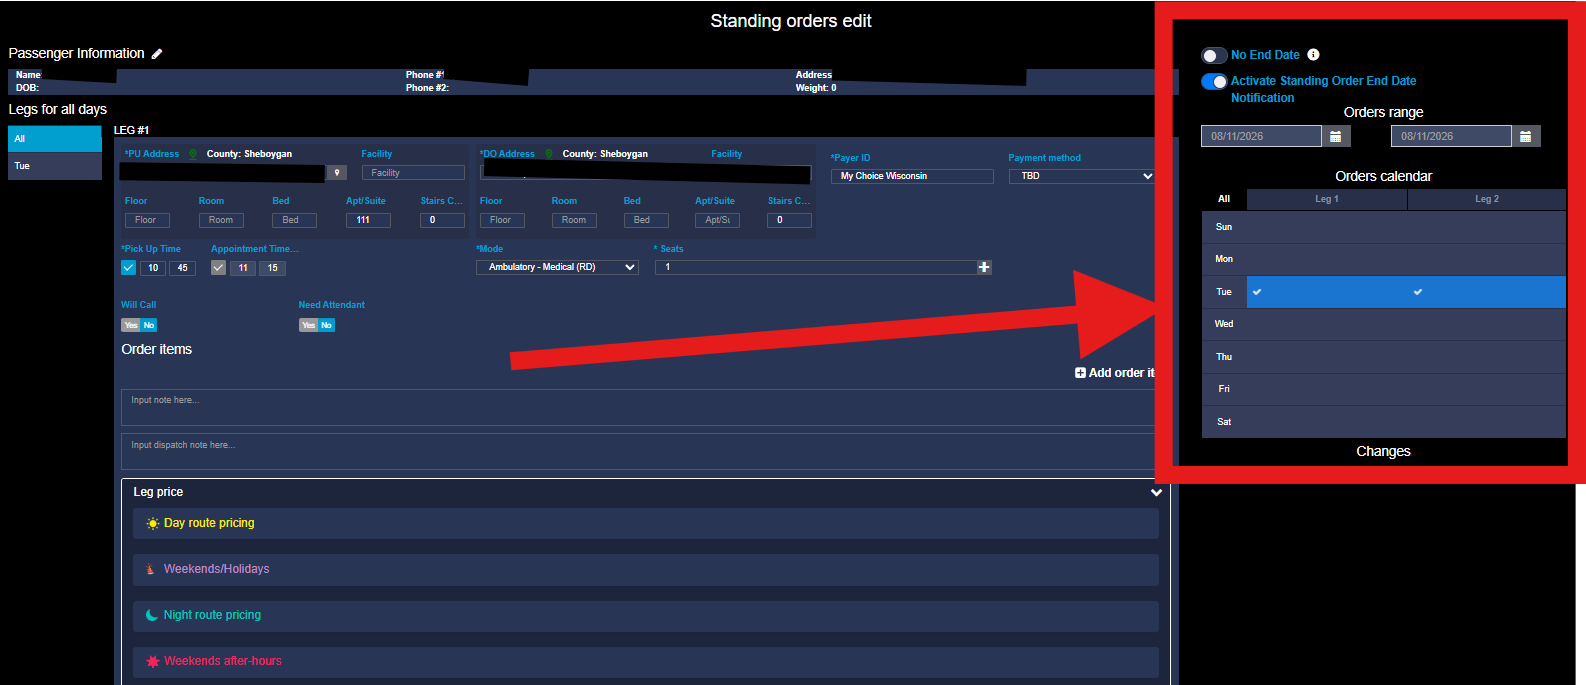](https://lakeshorekb.xyz/uploads/images/gallery/2026-08/ncNimage.png) Shown above, this is essentially the life blood of the standing order. It lets the system (and us) know how long this will be in effect for. There are a couple options available to us when setting a range and it is important to understand how they work. [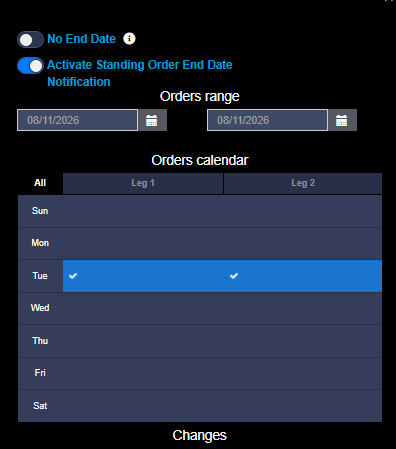](https://lakeshorekb.xyz/uploads/images/gallery/2026-08/lOAimage.png) #### No End Date Toggling on this option (shown in the image above) will remove "Activate Standing Order End Date Notification" and the end range from "Orders range" essentially putting the order in to an endless repeating state. We dont really use this at Lakeshore for a few reason but the biggest one is, orders always end eventually and when they do we need to cancel any remaining orders. We want to minimize cancelled orders from building up in the system as much as possible, also it limits your options when it comes to managing standing orders. So unless specifically told, this should always be left off. #### Activate Standing Order End Date Notification It is important to know when to leave this toggle on and when to shut it off. I personally will often use standing orders to quickly create small groups of similar or very similar orders. In this instance I am manipulating the system to quickly enter trips. If accidentally left on the notification toggle every time I did this we would get flooded with standing order renewals that we did not need. It also makes sense to leave it off if you KNOW the end date of the standing order, for example the client will be repeating the trip for two weeks only. In that case you know that you will not renew it. For any other kind of order you want to leave it on so that you get a notification when it is time to extend the order again. I normally do most standing orders 2 or 3 months at a time but you can come up with your own system. #### Order Range Here you will actually set your range. Each entry has a calendar drop down, although you rarely need to change the start date, just the end. As I have said a few times now I find it best to set them for a couple months at a time but that is up to you. One thing I will suggest is not to start setting all the end dates to the same date in an attempt to "organize" them and have them all be done on the same day. It seems like a good idea at first but you end up spending way too much time working with these on the day they change and it floods your notification drop down. I personally tried it when I first started and it is def. better to just do them one at a time as they come up. #### Orders Calendar So here you select the days and legs. The day and legs of your initial order will already be selected automatically. The image above only shows 2 legs, when there is more than 2 a column is just added for each extra leg. If you want to repeat the orders and legs on other days as well you simply click the box to add a check mark in each corresponding spot. ### Changing and Ending Standing Orders #### Ending An Order When it is time to end an order you simply uncheck every box in the "Orders Calendar" and set the end date in the range to the current day. Then scroll all the way down to the bottom and hit save. #### Pre-Assigned Orders Keep in mind that when you make changes or end a standing order only the unassigned orders will be changed or ended. Pre Assigned orders will need to be manually changed or cancelled. When simply making an address or time change it is best to unassign all of the pre-assigned orders first and then go and edit the standing order. When it comes to canceling them this does not apply as it is just as much work to unassign them as it is to cancel them.